Friday, August 28, 2015

DIY SHIRT WITH QUOTE


Svidja vam se neki slogan, tekst, stih?! Ukoliko zelite da ga podelite sa drugima, ovo je idealan nacin. Kreirajte unikatnu majicu. Naravno, mozete biti mastoviti i nacrtati nesto. Mogucnosti su razne. 
Sve sto vam je potrebno je:
  • boja ili flomaster za tkaninu
  • natpis koji zelite (opcionalno)
  • karton
  • olovka

Do you like a quote, text, verse?! If you want to share it with others, this is the ideal way. Create a unique shirt. Of course, you can be imaginative and draw something. The possibilities are many.
All you need is:
  • paint or marker for the fabric
  • the label you want (optional)
  • cardboard
  • pencil


Istampajte ili prekopirajte zeljeni tekst ili crtez (trebalo bi da bude u originalnoj velicini koju zelite na majici). Stavite papir unutar majice i olovkom prekopirajte slogan. Ovaj korak je opcionalan jer mozete otprilike da pisete, ali savetujem vam da radite na ovaj nacin da bude urednije.
Ukoliko smatrate da vam ovaj korak nije neophodan, ne morate ga raditi, ali u tom slucaju morate paziti da vam se papir ne pomeri dok bojite bojom za tkanine da ne bi bilo neuredno.

Print the desired quote or copy or drawing (should be in the original size that you want on the shirt). Put the paper inside the shirt and with pencil copy quote.
If you feel that this step is not necessary, do not have to do it, but in that case you must ensure that your paper does not move until you paint.


 Zatim izvadite papir i unutar majice stavite karton da vam se boja ne prenese na poledjinu majice. 

Then remove the paper and place the cardboard. This step is necessary that you paint does not transferred to the back of the shirt.


Bojom za tkanine ponovite postupak koji ste radili olovkom i popunite slova. 

Paint the letters.


Ostavite da se osusi par sati. Majicu je preporucljivo prati na 30C da sto duze traje. Mozete je najnormalnije peglati, cak je preporucljivo prepeglati je da nakom sto se boja osusi.

Leave to dry a couple of hours. You should washed shirt at 30C. You can iron it regularly.


I to je to! Nadam se da cete biti kreativni. :)

And that's it! I hope that you will be creative. :)


Thursday, August 13, 2015

PILLOWS AND BEDSPREAD - REDECORATING MY ROOM


Prilikom preuredjivanja stolice koje ste imali prilike da vidite u ovom postu http://myspecialobsession.blogspot.com/2015/07/diy-comfy-chair.html , ostalo mi visak materijala koji sam iskoristila da napravim ukrasne jastucice. Pritom se uklapaju i uz stolicu sto je plus. S obzirom da mi je posteljina takodje cvetnog dezena, odlucila sam da napravim i ovaj beli prekrivac za krevet, jer bi u suprotnom bilo previse sareno. Krajnji rezultat mi se dopao, a sad koliko ce to stajati na krevetu pitanje je vremena ili dok mi sledeca ideja ne padne na pamet.

A few posts ago, when I rearranging the chair that you had opportunity to see in this post  http://myspecialobsession.blogspot.com/2015/07/diy-comfy-chair.html , I had left overs of the same fabric that I have used to make decorating pillows. Goes perfectly with the chair, which is always a plus. I decide to make this white bedspread, because the bed sheet was floral and with the floral pillows is too much. I liked the final result, and how long it will stand on the bed is the matter of time. Probably to new idea.


Friday, August 7, 2015

DIY HAND JEWELRY HOLDER


Ne znam za vas, ali ja imam taj problem da ako mi nakit nije pred ocima, kao da ga i nema. On potpuno padne u zaborav. Upravo iz tog razloga se trudim da ga izlozim nekako, ali da to opet ne bude prenatrpano. Sa prstenjem, naravno, postoji najveci problem, jer kako njih urediti, a da to iole lepo izgleda. Malo sam mozgala, guglala, i dosla do resenje. Ruka za nakit. Lepo izgleda, poprilicno jednostavno se izradjuje. Sta cete bolje?! 

Sve sto vam je potrebno od materijala je:
  • gips
  • neka posuda i nesto sa cime cete promesati
  • gumena rukavica
  • plasticni deo koji ide u tegle i kanap (ili mozete koristiti i veliku teglu, rukavicu staviti unutra, a gornji deo prevrnuti oko otvora tegle, na taj nacin ce rukavica visiti unutar tegle da se susi).

Treba vam samo par minuta da ovo odradite. Umutite gips (smesa treba da je gustine kao za palacinke :). Zatim postavite rukavicu da visi i sipajte gips u nju. Kada sipate gips moze se desiti da udje vazduh, pa ostane rupa na vrhovima prstiju, tako da stisnite rukavicu malo nakon sto sipate gips, da nestanu mehurici. Iako se on brzo stegne, savetujem vam da ostavite preko noci da se osusi, jer treba vremena dok se gips ne stegne u potpunosti, pogotovo iznutra. Nakon sto se scvrsne, pazljivo makazama isecite rukavicu, i secite rukavicu sa svakog prsta posebno, jer se meni desilo da sam je povukla, a pritom se nije dovoljno osusilo, pa su otpali prsti. Mozda ce na nekim mestima biti neravnina, malo je ismirglajte. Kada zavrsite taj korak, mozete preci farbom ili sprejom po zelji. Tada je "ruka" gotova i spremna za vas nakit. 


I dont know about you, but I have the problem that if I dont see jewelry in front of my eyes, it does not exist for me. It completely falls into oblivion. For this reason, I try to expose it somehow, but again it is not crowded. With rings, of course, there is the biggest problem, because how to display them, and that even remotely looks nice. I've been ruminating googled and came up with a solution. Hand jewelry holder. It looks nice, quite simply diy project . What can be better ?!

All you need is:
  • gypsum
  • a vessel, and something you're going stir
  • rubber gloves
  • plastic part that goes into jars and rope (or you can use a large pot, put in the glove, and the upper part of the upturn around the opening of the jar, in this way the glove hang inside the pots to dry).
You need only a few minutes to have completed this. Beat gypsum (mixture should be density as for pancakes :). Then set up a glove to hang and pour plaster into it. When you pour the plaster can happen to enter the air and leaves a hole in the fingers, so squeeze the glove a little after pouring plaster, that the bubbles disappear. Although he quickly tightened, I suggest that you leave overnight to dry, because it takes time until the plaster has cured completely, especially inside. After becoming firmly, carefully cut with scissors glove and cut glove with each finger separately, it happened to me that I withdrew, and it just was not enough dried up and fell off fingers. You may be in some places to be uneven, take  sandpaper and off the extra. When you have completed this step, you can proceed with paint or spray. Then is jewelry hand is finish for you jewelry.


Friday, July 17, 2015

DIY COMFY CHAIR


Jos jedan uradi sam projekat koji je bio gotov za samo jedno pre podne, ali takodje mogu reci i najkomplikovaniji do sada. Kao sto vidite na fotografiji pre na stolici je bio samo sundjer, nije bila presvucena materijalom, tako da je bilo poprilicno komplikovano iskrojiti i sastaviti sve delove, jer nije postojala sema po kojoj treba raditi. I sam sundjer je menjan prosle godine i na tome je ostalo. Jedan deo je masinski siven, a jedan rucno jer drugacije nije bilo izvodljivo. Nogare su ofarbane u mat srebrnu boju. Posto je kupljenog materijala bilo i previse, ostatak sam iskoristila za jastucice na krevetu, ali to od nekih od narednih postova. 

Another DIY project that was completed in just one morning, but I also can say the most difficult so far. As you can see in the photo before, the chair was covered only with sponge, there was no scheme by which one could work. One part of the material is machine-sewn and one is with hand, because otherwise not have been possible. The legs of the chair are painted in matte silver color. Since I have left overs of material, the rest I used for cushions, but that in the incoming posts.  


Monday, July 6, 2015

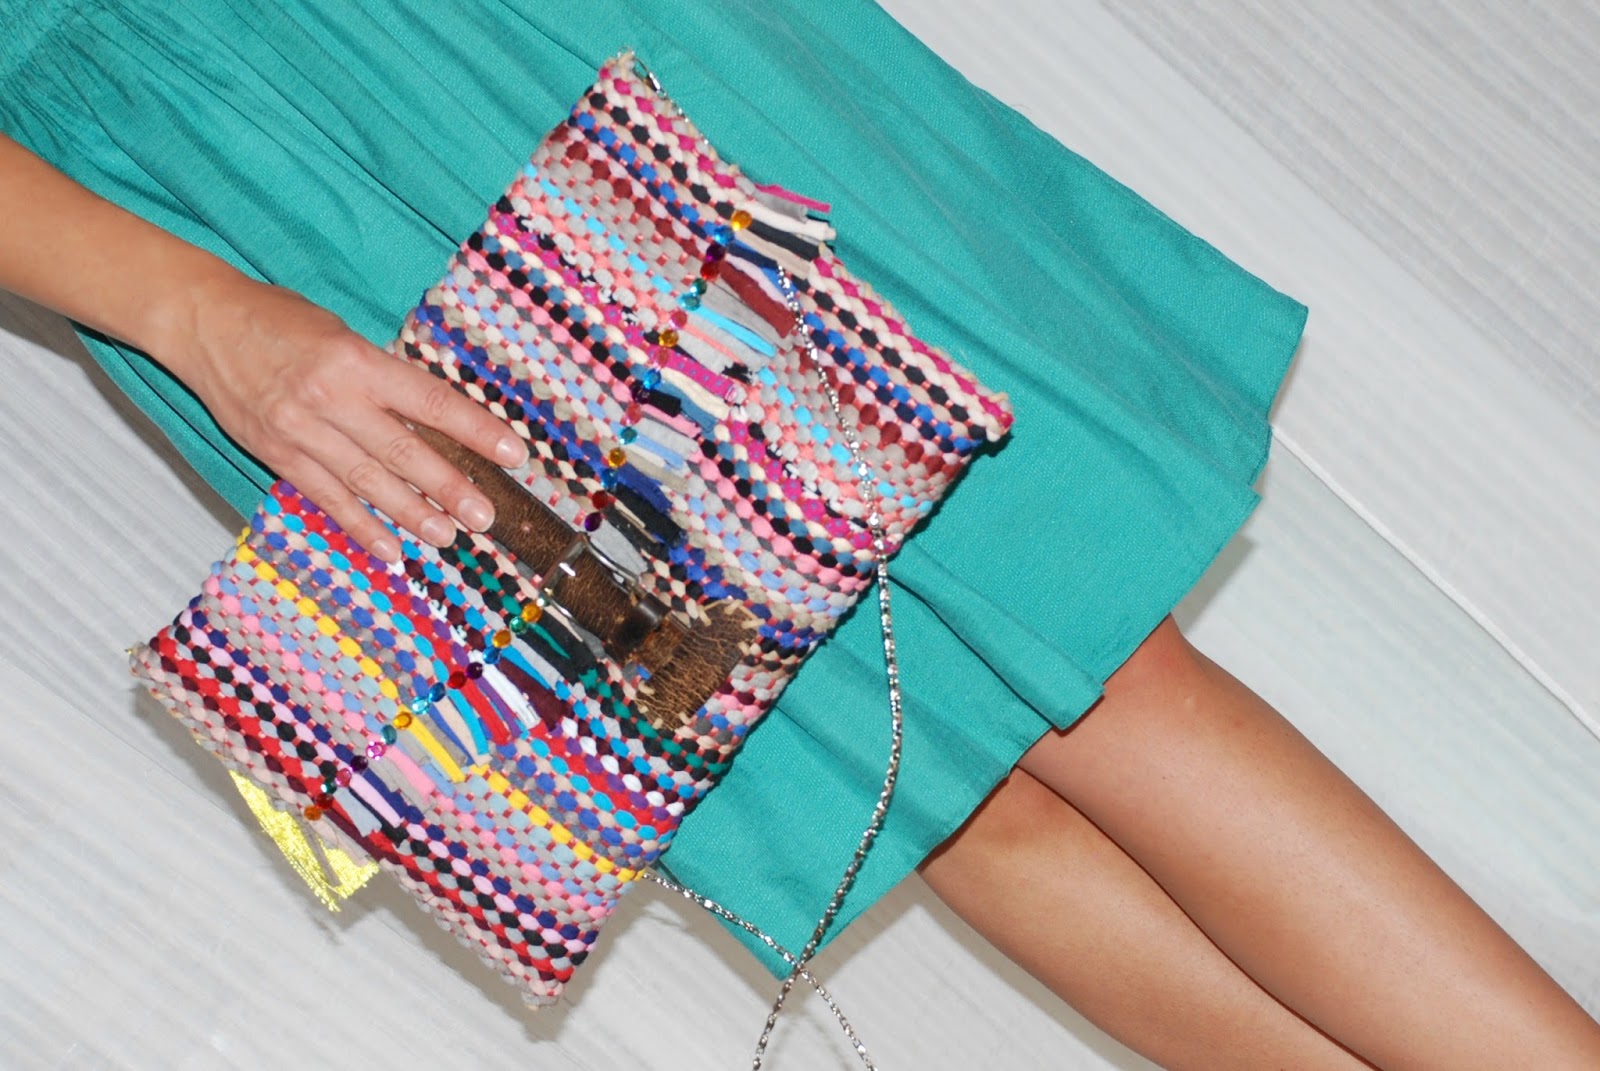
DIY MULTICOLOR BOHO BAG


Ovo leto sam htela da imam sarenu torbu i to neku manju, posto nigde nisam uspela da pronadjem neku koju ni se dopada, resila sam da se potrudim i da je sama napravim. Ne kazem da je postupak brz, ali ne mogu da kazem ni da je prezahtevan. U svakom slucaju ja sam prezadovoljna rezultatom. Celokupno pakovanje mi se posebno dopalo. 

This summer I wanted to buy multicolor smaller bag, but i could not find it anywhere, i decided to do it myself. I can not say that the project was fast and easy, but it was not too heavy. In any case I am very happy with the result.


Potreban materijal:                                                Material needed:
-rese                                                                      -tassels
-lanac                                                                    -chain
-krpara                                                                   -mat
-2 m kozice ili kanapa                                            -2 m rope
-2 alkice                                                                 -2 rings
-ostaci kaisa                                                          -remains of old belt
-stras                                                                     -zircons
-makaze                                                                 -scissors
-busac rupa                                                            -punch for holes
-pistolj sa lepkom                                                   -glue gun


1. Napravite mustru kako zelite da vasa torba izgleda. Preklopite krparu na otprilike jednu trecinu.
2. Provucite kanap tako da spojite dve strane. Na kraju ga dobro ucvrstitite da vam se ne odveze.
3. Postavite kopcu gde treba, kako ste prethodno izmerili.
4.Pricvrstite je tako da se ne vidi. Ja sam pricvrstila zicom, jer sam mislila da ce je tako najbolje drzati i da se nece pomerati.
5. Izbusite rupe sa strane ona dva parceta od kaisa.
6. Zatim postavite kao sto je na slici, i pricvrstite kanapom, kao sto ste i ivice torbe pricvrstili.
7 i 8. Okrenite tasnu na nalicje i lepkom zalepite krajeve kanapa da vam se ne odveze, ovako znate da nigde nece mrdati. Ja sam to uradila sa svim krajevima.
9. Sada okrenite tasnu na zadnju stranu i postavite gde bi trebao da ide veci deo kaisa.
10. I ovaj kao i onaj deo napred, pricvrstite zicom.
11 i 12.. Opet sakrivamo deo koji smo pricvrstili sa ovim manjim delom, takodje kao i napred smo smo uradili.
13. Posto je tasna bila poprilicno mlitava i savijala se sa svih strana, odlucila sam da je ucvrsim tako sto cu staviti zicu kao konstrukciju koja ce dati torbi cvrstinu. Tako da vam treba 4 deblje zice, dve za duzinu i dve za sirinu.
14. Prvo sam stavljala dole zicu, tako sto sam okrenula tobrnu na nalicje i provukla zicu. Lepkom sam pricvrsila spojeve porbe i zice tako da se ona nigde ne vidi i da dobro drzi.
15. Vidi se kako izgleda zica iznutra sada kada je torba prevrnuta kako treba.
16. Zicu tako pricvrstite iznutra i sa preostale tri strane.
17. Stavite alkice sa strane gde cete okaciti lanac, zatim ga i okacite.
18. Stavite resu.
19. Ja sam polepila i ove cirkoncice da mi se ne vidi sav, a i nekako mi je bilo lepse.
20. I, voilaaaa!

1. Make a pattern how you want your bag to looks like. Fold the rug for about one-third.
2. Thread the rope to connect two sides. At the end of it secure it.
3. Place the buckle.
4. Attach it so it does not see. I used the wire, because it is firmest.
5. Drill holes on the side of those two pieces of the belt.
6. Then put it across the buckle, and secure it with the rope.
7 and 8. Turn the bag reverse and with glue gun secure the end of the rope. I did it with all ends of the rope.
9. Now turn the bag on the back side and place where it would have to go bigger part of the belt.
10. This part as well attach with wire.
11 and 12. Again hide the part that was secured.
13. Since the bag was pretty limp, I decided that so I put the thick wire something like a construction that will give solidity to the bag. So, you need 4 thick wire, 2 for the lenght and 2 for the width.
14. First, reverse the bag and slip the wire. Glue the wire on the bag.
15. How it looks wire inside bag.
16. Fixed the wire in the other thread sides.
17. Place the rings on the both sides and hang the chain.
18. Place the tassel.
19. Glue the zircons.
20. And, violaaaaa!